Showing posts with label Vegan. Show all posts

Sunday, July 30, 2017

Simple Green Smoothie Recipe (Yummy + Vegan + Quick)


I drink a green smoothie almost every morning - almost being the key word. So maybe I should say: I drink a green smoothie a lot of mornings. Regardless, whenever I drink them, I make this recipe. This recipe is so yummy that I'm not even curious to try fruit smoothie recipes all that often. Trust me, there is no bitter veggie taste in this smoothie.


Healthy...
This recipe is incredibly easy to make and amazingly healthy. The amount of fiber, alone, in this recipe, is unbelievable.  Expressive juicing is great but the downside is that all the fiber is lost. Not so with smoothies!  All the natural fiber in the produce is retained. In addition, take a look at the nutritional breakdown below!  This green smoothie is chock full of fiber, vitamins, minerals, antioxidants, and immune-boosting ingredients.

Adjustable...
I have found that strawberries are a great pick to use as a second fruit in this recipe but honestly, you can sub whatever fruit is your favorite or whatever fruit you have on hand in their place.


Easy...
This is literally a  wash-chop-dump recipe. You can even have your apples and strawberries pre-chopped and then this would be a dump and blend recipe. Also, you can prepare batches of this recipe by layering the chopped fruit and spinach in several mason jars so that in the morning you can just dump, pour a splash of almond milk, blend and go!! The possibilities are excitingly endless :)

Note on Texture:
This green smoothie has a smooth and creamy texture when just prepared but it will thicken up if left to sit for a while due to the high pectin content in the apple. So, if you like thinner smoothies try to drink it right away, and if you like thicker smoothies, you can let this rest for awhile and it will thicken up!


Ingredients
Yield: 1 single-serve Green Smoothie
  • 1 Apple
  • 4 Strawberries
  • 2 cups Spinach, loosely packed
  • 1/4 cup Almond Milk
Note: You can add more or less almond milk if you wish to alter the consistency according to your preference.


Directions
  1. Gently wash the apple and Strawberries. 
  2. Core and roughly chop the apples and strawberries
  3. Add all ingredients to the blender and blend on high for 1-2 minutes. I literally mean that. I like my green smoothies smooth and creamy. I find that the flavors soften and meld together in a magical way, so blending them adequately is an important step. If you prefer chunkier green smoothies, then ignore this step. 
  4. Pour into a glass. drink with your mouth or with a straw. 

Enjoy!


- Nutritional Analysis -


Look at that whopping 9 grams of fiber. Annnnddd, you get all your Vitamin A and Vitamin C for the day all before 10 am!!


- Cost Breakdown -


Monday, July 24, 2017

Three-Cheese Lasagna Recipe - Vegan, Quick + Easy


Yep, you read correctly! This is a recipe for three cheese lasagna and it is all VEGAN!! This recipe uses Tofu Ricotta, an almond based Parmesan, and a Cashew Mozzarella. This is a recipe for a one of the most classic dishes and its great to make for a potluck, Italian-themed dinner party, or as your main dish for your week of meal prep. This is a good dish to prepare when you have a bit of extra time. it is not complicated to make and it pretty straight forward but it does have several steps to it. If the Tofu Ricotta and Vegan Parmesan are made ahead of time, then it will make the process much quicker.


Ingredients
Yield: one 9" x 13" Baking Pan


For the Lasagna: 

  • 2 Recipes Tofu Ricotta Cheese (5 cups)
  • 1/2 Cup Vegan Parmesan
  • 1 package LightLife GimmeLean Veggie Sausage
  • 1 box Lasagne (16 noodles)

For the Cashew Mozzarella:

  • 1/4 cup Cashews
  • 1/3 cup Nutritional Yeast Flakes
  • 3 Tablespoons All Purpose Flour or Rolled Oats
  • 2 Tablespoons Cornstarch or Arrowroot Powder
  • 2 teaspoons Onion Powder
  • 1/2 teaspoon Salt
  • 2 Tablespoons Apple Cider  Vinegar OR 1/4 cup Lemon Juice
  • 1 cup Water


Note:
- You probably will not need all the noodles in the box, but preparing all of them will save your lasagne just in case some of the noodles break while you are preparing the dish. Also, you can make as many or as few layers that you like so you may even want to use more noodles. It's completely up to your liking :)


Assembly

  1. Have the Tofu Ricotta and Vegan Parmesan already made.
  2. Preheat oven to 350F and oil a 9" x13" baking pan.
  3. Make the Cashew mozzarella by combining all the ingredients for it and blending on high for 1-2 minutes. That may seem like a long time but this is truly the secret to creating a smooth, creamy vegan cheese sauce. Also, the cheese will taste much better since the flavors are more thoroughly combined.
  4. Boil the Lasagna according to the package directions. 
  5. Open the GimmeLean Sausage, Break it into large pieces, and brown in a non-stick pan with a small amount of oil. As the GimmieLean Sauage begins to heat through, continue breaking it into smaller pieces according to how you desire it. When the Sauage is browned as you wish,  turn off the burner and remove from the heat.
  6. When the noodles are finished, pour into a colander and rinse with cold water to stop the cooking process and prevent them from sticking together.
  7. To keep to noodles separated, spray a baking pan with non-stick spray and place the noodles parallel to each other. This step is literally a lifesaver!
  8. Spread some tomato sauce over the bottom of the oiled baking pan. and layer in any order you wish. I have provided an example layering pattern, but honestly, you can make this your work of art and layer it according to however you want :)
      • Tomato Sauce
      • Lasagna noodles
      • Tomato Sauce
      • 1/2 GimmeLean Sausages
      • 1/2 of Tofu Ricotta
      • 1/3 of Cashew Mozzarella
      • Vegan Parmesan
      • Lasagna noodles
      • Tomato Sauce
      • Rest of GimmeLean Sausage
      • Rest of Tofu Ricotta
      • Vegan Parmesan
      • 1/3 Cashew Mozzarella
      • Lasage Noodles
      • Tomato Sauce
      • Rest of Cashew Mozzarella
      • Sprinkle of Vegan Parmesan
  1. Bake at 350F for 30-45 minutes. If you want a moister lasagna, cover the lasagna with foil. If you are preparing this lasagna for another time, bake for 30 minutes then reheat when you are ready.  If you choose to serve right away, let cool 10 minutes before serving.

Buon appetito!


- Cost Breakdown -


Sunday, February 26, 2017

Massaged Kale Salad with Toasted Walnuts and Cranberries


I love kale salad. But I realize that not everyone feels the same way. But this kale salad recipe has the magical power of persuasion to convert anyone into a kale-loving freak!  Guaranteed. Earlier this year, I participated in the Partners-in-the-Parks study tour with the National Honors Society which was absolutely awesome! On the trip, our chaperones gave us the freedom to choose and cook our meals. Not only did we have an insane amount of fun cooking together but everyone chose their favorite recipes so every meal was incredibly delicious!! Guess what one of the items on my menu was? 

Gosh, how'd you know? 


This recipe was the star of the show. Literally, every person hailed praises to this simple green salad. Even the most hesitant skeptics savory every crunch with delight. The Chaperone said "I have never, in my 62 years, ever tasted kale prepared in such a delicious way"! So, you ready to join the party? I figured so. Let's do this!

Choosing the right quality ingredients are important. The ultimate trick, however, to creating is an awesome kale salad is about two techniques: 1) Finely chopping the kale and 2) Massaging the salted kale.  Read on and learn...


INGREDIENTS

Salad
  • 2 bunches of Kale
  • 1/2 cup Walnuts
  • !/4 - 1/3 cup dried Cranberries
Dressing
  • 1/4 cup Olive Oil
  • 1/4 cup Lemon Juice
  • 1/4 cup Honey

DirecTIONS

  1.  Heat a cast iron skillet on medium heat. Toast the walnuts for 10-15 minutes or even longer. The toastiness is up to you. Once the walnuts are done. Remove the walnuts from the pan and set aside to cool.
  2. Remove the middle ribs (stalks) from the kale. Then chop the kale finely. I chop the kale horizontally then rotate it 90 degrees and chop in that direction again. 
  3. Add all the chopped kale to a large bowl, sprinkle with salt, and begin the massage the kale. The massaging is a gentle rubbing, not a pounding motion because you don't want to beat out the juices. The color of the kale will change from an average green to a deep vibrant green hue. 
  4. By this time the toasted walnuts should have cooled down. Roughly chop them into smaller pieces. Add the walnuts along with the cranberries to the kale in the bowl.
  5. In a small bowl, whisk together the olive oil, lemon juice, and honey to make a dressing and pour all over the salad. Toss the salad thoroughly to ensure that every shred is coated with the dressing. Refrigerate for 2-4 hours. Serve and enjoy!


Sunday, December 18, 2016

Vegan Caramelized Nuts Recipe


This is a recipe for scrumptious vegan caramelized nuts! In our traditional Jamaican family, caramelized or candied nuts are not commonly eaten. So when my mom decided to make these, I was rather indifferent. After tasting one crunch of these, I instantly understood all the talk I had heard about caramelized/candied nuts being so delicious! 


You'll probably want to make at least two recipes of these treats because they will not last for long!


What I especially like about this recipe is the absence of butter! Instead these are gently coated with a light coating of extra virgin coconut oil which is so healthy for you!


Ingredients


  • 1 Tablespoon Extra Virgin Coconut Oil
  • 1/4  cup Brown Sugar
  • 1 1/2 cup Whole Pecans 
  • Dash of Cinnamon
  • Dash of Allspice
  • Dash of Salt


Directions

  1. Heat a large cast iron skillet over medium high heat.
  2. Add the coconut oil to the warm skillet.
  3. Once the coconut oil is fully melted stir in the sugar and allow that to melt for about 4-5 minutes
  4. When the sugar is melted and browned, throw in the nuts, salt, and seasoning. Continue to stir the nuts until the sugar begin to harden when the spoon is lifted from the pan.
  5. Pour the nuts out onto and pan lined with parchment paper. If you want the individual nuts, gently separate them immediately after pour onto the parchment. If you want clusters of nuts, leave them together.
  6. After the nuts have cooled, enjoy!


Friday, January 29, 2016

Vegan Goldfish Crackers

goldfish 1


Growing up, Goldfish were one of my favorite snacks. My mom never bought a whole box of goldfish for me and my brothers to snack on, she didn't buy much snacks at all for that matter. But sometimes, when I was a very good girl, my mom would treat me to something special. Through the bustle of a typical Manhattan street, we would enter the DUANEread on 72nd street, and take the escalator to the first level; at this point my mom and I would separate, I would walk a well known route to the snack isle, snatch a small waxed carton of goldfish off the shelf, and find my mom to purchase my treat parcel. As a girl, I took pride in possession. It was actually more like an issue... I savored the knowledge of all the things that I still had.
The following was a typical thought process:
" I still have those Hello Kitty stickers,
hello-kitty
I still have that cookie,
 hqdefault
I still have my brothers daily crime log,
jl-note
 I still have my goldfish from this morning,"
girl laughing
So in the end, Goldfish meant a lot to me.
I have been working on this vegan goldfish crackers recipe for a while now, and it's still a work in progress. Each time I make them, I twerk and adjust the ingredients a little. But this recipe has the best proportions, at least so far. After doing a little research (picking up a box of goldfish) I discovered that there is more to that distinct goldfish flavor than just a cheesy taste. The Active dry yeast is included not only for its rising properties, but it actually has a distinct flavor: it's nutty and faintly umami. The Ascorbic Acid gives that subtle twang that is so familiar to cheesy products. Celery salt creates a faint bitter undertone that compliments the Nutritional Yeast well.
For the Crackers
2 3/4 cups Unbleached all-purpose flour
3/4 cup Nutritional yeast flakes
2 teaspoons Aluminum free baking powder
1/2 teaspoon Salt
1 teaspoon Paprika
Dash Cayenne pepper ( optional)
1 teaspoon Onion powder
1/4 teaspoon celery salt
1/4 teaspoon Active dry yeast
1/4 teaspoon Vitamin C powder (Ascorbic acid)
2 Tablespoons Lemon juice
1/2 cup Olive, grape seed, or safflower oil
1/2 cup Ice cold water
The Directions
  1. Preheat the oven to 350 F. Mix together all dry ingredients thoroughly. Make a well in the center leaving about 1/2" of flour on bottom of bowl, add oil water and lemon juice. Mix the liquids together in the well, then begin stirring in the surrounding flour. Mix and mix until it forms a dough, DO NOT KNEAD! Let it rest for 25 - 30 minutes.
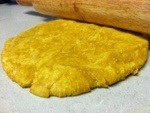
  2. Flatten the dough into a disc then use a rolling pin to roll it out into a large irregular shape.
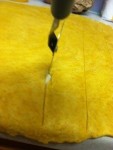
  3. Cut the dough with a knife (or use a pizza slicer to make the job easier on yourself) into squares or triangles or diamonds or any shape you like.
  4. ORRR... you can use a cookie cutter to cut out cutesy little shapes like fishes or little people. And then you might as well be bored because your going to get bored if your not. It takes forever to pick up those little crackers, that's why I don't make little crackers I make big chunky squares and irregular shapes, (cuz, ain't nobody got time for that...) But here is a link for cute little fish cookie cutters here.
  5. Place the crackers on an oiled baking sheet and bake them for about 15-25 minutes. Remove them from the pan and allow them to cool before to bite into these cheesy, crunchy bites! 
Tip: The perimeter around baking pans is hotter than the interior. So don't place any crackers too near to the edges of the pans to prevent them from burning.

goldfish 3

goldfish 2


Wednesday, January 27, 2016

Vegan Greek Quinoa Salad

IMG_0094[1]
This Quinoa salad is one of my moms favorite dishes to prepare. She will prepare it a least once every two weeks.
First, what is quinoa? Quinoa is an old food. It's been around for thousands of years. Historically, the Incas, of what is today Peru, grew and cultivated quinoa. Did you know that quinoa is not a grain? Nope. It is actually a pseudo-cereal. Cereals like oats, millet, spelt, wheat, and rice come from grassy stalks, whereas psuedo-cerals are not memebers of the grass family. In addition to quinoa, buckwheat, amaranth, and chia seed are also psuedo-cereals. There are hundreds of varieties of quinoa. But the most common types available for purchase are red, white, and black.
Quinoa is a super healthy food! It is a nutritionally compact, whole food and it has almost twice the amount of fiber than most other grains.
"Quinoa is naturally gluten-free and contains iron, B-vitamins, magnesium, phosphorus, potassium, calcium, vitamin E and fiber. It is one of only a few plant foods that are considered a complete protein and comprised of all [nine] essential amino acids. Quinoa also has a high protein to carbohydrate ratio when compared to other grain products. It was proposed by NASA to be an ideal food for long duration space flights." According to http://www.medicalnewstoday.com/articles/274745.php
In addition to being rich in vitamins, minerals and protein, Quinoa also contains high amounts of antioxidants and oleic acids.
The coating of the quinoa grain contains saponin. Saponin is a naturally occurring insect-repellent designed to prevent insects from biting into the grain by creating a bitter tasting coating. Unfortunately, insects aren't the only ones who taste the bitter saponin. To eliminate that unpleasant taste, simply wash the quinoa thoroughly several times until the water runs clear.
The Frugal Side: 
So, I know what you're thinking, "But quinoa is expensive!!" And you are right. Quinoa averages $4.50 to $8.00 per pound, depending on where you shop. But there are a few tricks to making quinoa frugal:
  • Buy in bulk - This can mean, buying from the bulk section, buying a larger bag, or buying from a wholesale club. Large bags of quinoa typically come in 4 pound sizes. A 4 pound bag of quinoa costs
  • Buy online 
  • Buy the white quinoa. Save the more exotic varieties for special occasions.
On top of getting a great deal, quinoa can be made cost effective by preparing it correctly and eating it with moderation. Make sure you use enough water when cooking quinoa so that each grain fully expands. Cooked quinoa should equal 2-3 times the raw equivalent. Even though quinoa can be expensive, the reason why I said that it is a great food for college students is because: 2 cups of raw quinoa that fed me for 12 times!
Calculated at $8 per pound, 2 cups of quinoa costed me $6.40, say the veggies and seasonings costed $3.60. So I only spent $.71 each morning for a full bowl of energy packed, super-healthy quinoa salad!

IMG_0089[1]
The Salad
2 Cups Quinoa, uncooked
1-2 small Tomatoes, Diced
1/2  a large Cucumber, chopped
Parsley, 6-7 stalks
1 medium sized Red or White onion, diced
The Dressing
2-3 tablespoons Lemon Juice
1/4 cup Olive Oil
1/2-1 teaspoon Salt
1/4 teaspoon Black Pepper
The Optional Additions
Black beans
Corn
Tofu feta
Cranberries
Kalamata olives
Green onions
Chopped walnuts
The Directions
  1. Whisk together the lemon juice, olive oil, black pepper, and salt in a medium-sized bowl. Leave the dressing to rest while you prepare the remaining ingredients.
  2. Place the quinoa in a strainer and rinse under the tap until the water runs clear. Combine the quinoa, 3 1/2 water, and a pinch of salt in a medium sized saucepan, cover the pot,  and bring to a boil. Immediately after it comes to a boil, lower the heat to medium-low and simmer until the water is absorb and the quinoa swells, approximately 20-30 minutes.Once the quinoa has finished cooking, uncover the pot, lightly fluff, and allow the quinoa to cool for 7-8 minutes.
  3. In the meantime, chop the tomatoes, onions, cucumbers, and parsley into a large mixing bowl. Add the cooled quinoa and dressing, Toss everything together until well combined. At this point, the salad is complete, but if you let it sit in the fridge for a couple of hours, it will be even better! Enjoy.
IMG_0042[1]